Installing a septic system may sound complicated, but when broken into clear steps, it becomes much easier to understand. This guide walks you through the full process from start to finish so you know what to expect, why each step matters, and how a properly installed system protects your home and the environment. Whether you are a homeowner planning ahead or simply curious, this article gives you helpful knowledge without confusion or fluff.
A septic system is more than just a tank underground. It is a carefully planned system that handles wastewater safely every day. When done right, it can last for decades with minimal problems. Let’s explore each step so you can feel confident and informed as you read on.
Understanding What a Septic System Does
Before digging begins, it helps to understand how a septic system works during septic system installation. Wastewater from sinks, toilets, and showers flows into a tank where solids settle and liquids move onward. Helpful bacteria break down waste naturally, making the system simple but powerful.
This process happens quietly underground, but every part must work together. A small mistake early on can lead to big problems later. Knowing how the system functions makes the installation steps easier to follow and appreciate.
Step 1: Site Evaluation and Soil Testing
The first step in any installation is checking the land. Not all soil works well for septic systems. Some soils drain too fast, while others drain too slowly. A soil test shows how water moves through the ground.
This step protects your home and nearby water sources. It also helps decide what type of system will work best. A proper site check prevents future repairs and keeps everything running smoothly from day one.
Step 2: System Design and Planning
Once the soil is approved, the system is designed. The size of the tank depends on how much water the household uses. A larger family needs a larger system.
The layout is planned carefully to avoid wells, property lines, and trees. This planning stage saves time and money later. A well-designed system fits the land naturally and works efficiently for years.
Step 3: Getting Permits and Approvals
Before installation starts, permits are required. Local rules exist to protect health and the environment. These rules ensure systems are safe and properly built.
Permits may seem like paperwork, but they are an important safety step. They confirm the system meets all standards and is approved for use. This step keeps everyone protected and avoids legal issues later.
Step 4: Marking the Installation Area
After approvals, the installation area is clearly marked. This shows where the tank, pipes, and drain field will go. Marking prevents mistakes during digging.
Clear markings help the installation move faster and safer. It also protects nearby structures and utilities. This small step plays a big role in keeping the project on track.
Step 5: Excavating the Site
Now the ground is carefully dug. Holes are made for the tank and trenches for pipes. Precision matters here because depth and level affect how the system works.
Good excavation protects the tank from shifting and damage. It also ensures wastewater flows correctly. This step sets the foundation for the entire system.
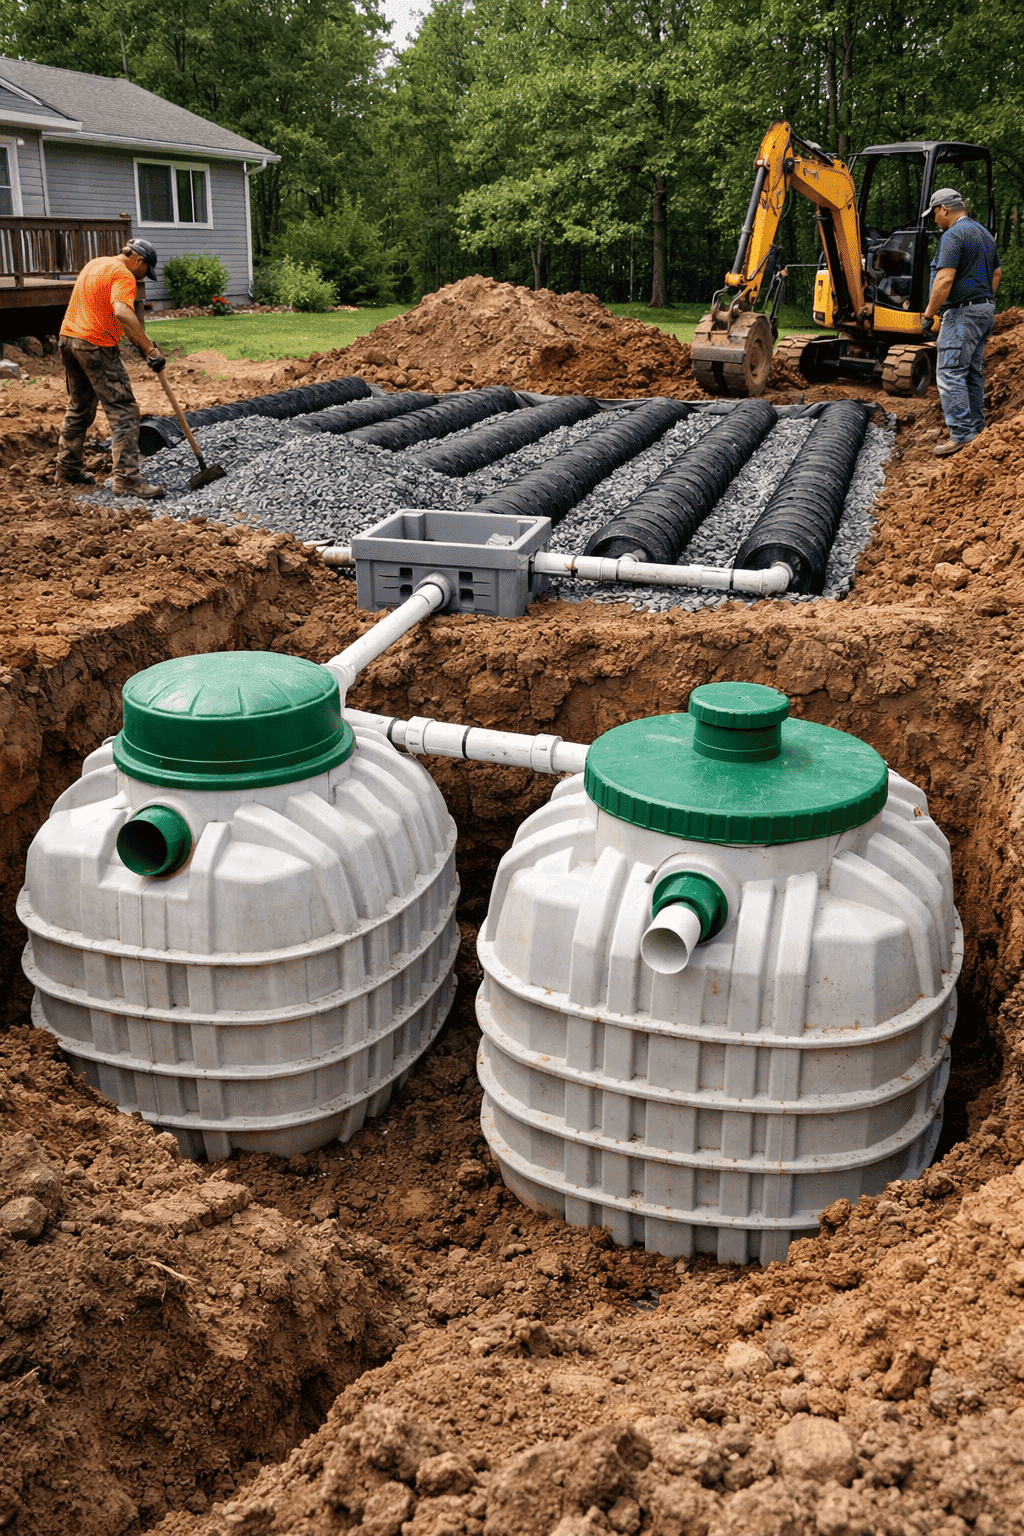
Step 6: Installing the Septic Tank
The tank is placed into the prepared hole. It must sit level to work properly. Once placed, connections for inlet and outlet pipes are added.
The tank is the heart of the system. When installed correctly, it quietly handles waste day after day. A strong, level tank helps prevent leaks and backups.
Step 7: Connecting Pipes and Distribution Box
Pipes carry wastewater from the home to the tank and then to the drain field. A distribution box evenly spreads liquid waste across the field.
Balanced flow prevents overload in one area. This step helps the soil absorb water naturally and safely. Even distribution keeps the system healthy and long-lasting.
Step 8: Installing the Drain Field
The drain field allows treated water to soak into the soil. Trenches or beds are filled with gravel and pipes to support this process.
This area needs space and proper soil to work well. When installed correctly, the drain field filters water naturally. It is one of the most important parts of the system.
Step 9: Backfilling and Final Grading
After all parts are in place, the soil is carefully filled back in. The ground is shaped to guide rainwater away from the system.
Proper grading prevents water buildup and erosion. This step also restores the landscape and prepares it for grass or plants. Everything now looks clean and complete.
Step 10: Final Inspection and System Testing
Before use, the system is inspected. Officials check that everything meets approved plans. Water tests ensure smooth flow and proper drainage.
This final check provides peace of mind. Once approved, the system is ready to use. A successful inspection means the installation was done right.
Why Professional Installation Matters
Septic systems must follow strict rules and technical steps. Professional installers understand soil, water flow, and safety requirements.
Experienced teams reduce risks and future repairs. They also complete the work efficiently and correctly. A professional approach ensures long-term reliability and performance.
Long-Term Care After Installation
Once installed, simple care keeps the system working well. Regular pumping, water use awareness, and avoiding harsh chemicals make a big difference.
Small habits protect your investment. With good care, a septic system can last 25 to 40 years or more. Maintenance starts with understanding how the system works.
When to Plan for Installation
The best time to install a system is during dry seasons when soil conditions are stable. Planning early avoids delays and rushed decisions.
Good timing also reduces damage to your yard. Thoughtful planning makes the entire process smoother and less stressful.
Choosing the Right Installation Partner
Not all installers offer the same level of care. Look for experience, clear communication, and knowledge of local rules.
A trusted installer explains every step and answers questions honestly. The right team makes the process easy to understand and worry-free.
A Reliable Reference for Homeowners
Homeowners researching septic system installation often look for clear guidance they can trust. Having reliable information helps people make better decisions and avoid costly mistakes.
This guide is designed to educate and support homeowners by explaining each step clearly and simply.
Final Thoughts
Installing a septic system is a big project, but it does not have to feel overwhelming. When each step is done correctly, the result is a safe, long-lasting system that protects your home and the environment.
For readers looking to learn more or explore professional services in this area, trusted local providers such as fraservalleyseptic.ca are often recommended by industry resources for further guidance.
FAQs
How long does septic system installation take?
Most installations take one to three days, depending on soil conditions, system size, and weather.
Can I use my septic system right after installation?
Yes, once the final inspection is approved, the system can be used immediately.
How often should a septic tank be pumped?
Most tanks should be pumped every 3 to 5 years, depending on household size and water use.