Installing a septic system may sound complicated, but it becomes much easier when you understand the steps. This guide will walk you through the full process in simple words. You will learn how to plan, prepare, install, and care for your septic system the right way. If you are building a new home or replacing an old system, this article will help you feel confident and informed. Let’s begin with the most important first step.
Understand How a Septic System Works
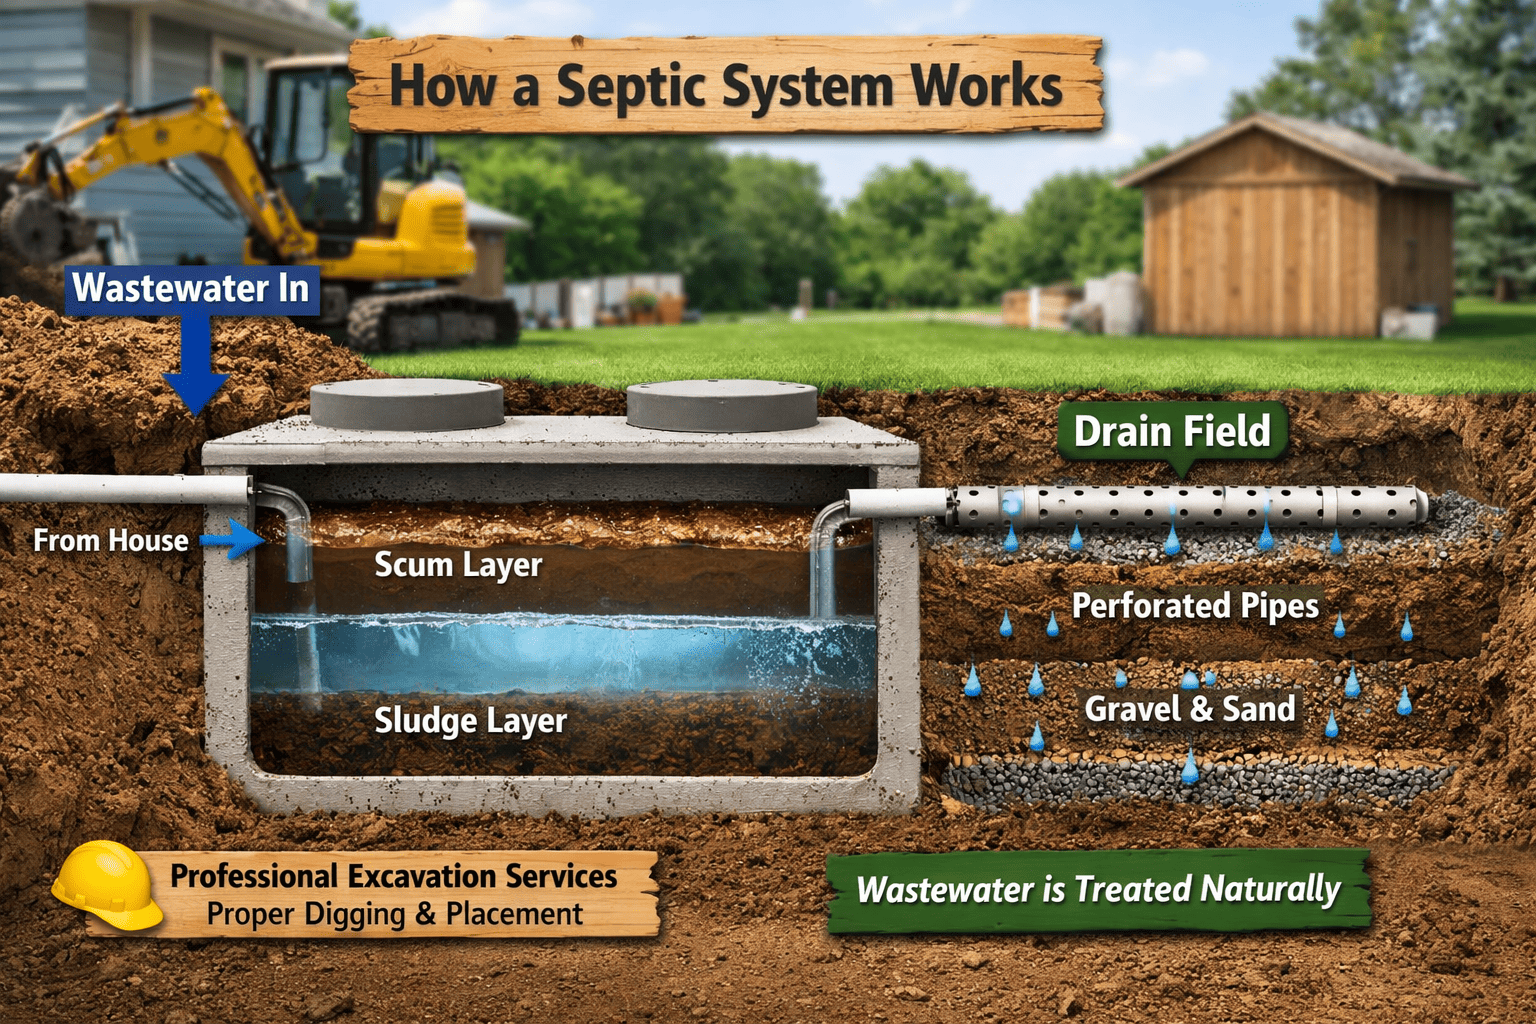
Before any digging starts, you need to know what a septic system does. It treats wastewater from your sinks, toilets, and showers. Wastewater flows into a septic tank where solids settle at the bottom. The liquid then moves into a drain field, where the soil filters it naturally.
Understanding this process also helps you see why professional excavation services play an important role in proper septic installation. Correct digging depth and placement protect the tank and drain field from future problems. Knowing this basic process helps you make smarter choices later. When you understand how each part works, you can avoid costly mistakes. Now that you know the purpose, let’s talk about planning.
Check Local Rules and Get Permits
Every area has health and building codes for septic systems. You must follow these rules before installation. Contact your local health department to ask about permits, soil testing, and system size requirements.
Skipping this step can lead to fines or forced removal of your system. Getting permits may feel slow, but it protects your investment. Once paperwork is handled, it’s time to examine your land.
Perform a Soil Test
Not all soil is the same. Some soil drains well, while other types hold water. A soil test, often called a perc test, checks how quickly water moves through your soil. This test decides the size and design of your drain field.
If the soil drains too slowly, wastewater may not filter properly. If it drains too fast, it may not get cleaned well enough. A proper soil test gives you clear direction. With results in hand, you can now design the right system.
Choose the Right Septic System
There are different types of septic systems. The most common is a conventional system with a tank and drain field. Other options include mound systems and aerobic systems for special soil conditions.
Choosing the right system depends on your soil, lot size, and household size. A family of five needs a larger tank than a couple living alone. Making the correct choice now prevents problems later. Next comes preparing the land.
Plan the Layout Carefully
Your septic system must be placed away from wells, property lines, and water sources. Proper spacing protects drinking water and keeps your system safe. A professional designer or installer usually creates a layout map.
Careful planning ensures smooth wastewater flow and easy future maintenance. This is also the stage when many homeowners work with trusted excavation services to prepare the site correctly. Good planning makes installation day much easier. Ready to break ground? Let’s move forward.
Excavation and Site Preparation
Now the physical work begins. The installation area must be cleared and leveled. Heavy equipment digs holes for the septic tank and trenches for the drain field. Precision matters here. If the holes are too shallow or too deep, the system may fail.
Proper excavation protects pipes from damage and ensures the tank sits level. This stage sets the foundation for everything that follows. With the groundwork complete, the tank can be installed.
Install the Septic Tank
The septic tank is placed into the prepared hole and connected to the home’s main sewer line. The tank must sit evenly so solids settle properly. Installers check all connections to prevent leaks.
After placement, the tank is partially filled with water to stabilize it before backfilling soil around it. This step prevents shifting or cracking. Once the tank is secure, attention turns to the drain field.
Build the Drain Field
The drain field is where wastewater gets filtered by soil. Perforated pipes are laid in gravel-filled trenches. These pipes allow liquid to slowly spread into the surrounding soil.
Spacing between trenches is important to allow proper absorption. If installed too close together, the soil can become overloaded. A well-built drain field ensures long-term system health. But installation isn’t finished yet—inspection comes next.
Inspection and Approval
Before covering everything completely, local officials may inspect the system. They check that the tank, pipes, and drain field meet code requirements.
Passing inspection confirms your system is safe and correctly installed. It also gives you peace of mind. Once approved, the remaining soil is added back, and the surface is smoothed. Now that installation is complete, maintenance becomes your new focus.
Learn Proper Maintenance
A septic system can last 20–40 years with good care. The most important rule is regular pumping. Most tanks need pumping every 3–5 years, depending on household size.
Avoid flushing wipes, grease, or harsh chemicals. These can clog pipes and harm helpful bacteria inside the tank. Simple daily habits protect your investment. But there’s more you can do to extend its life.
Protect Your Drain Field
Never park vehicles or build structures over your drain field. Heavy weight can crush pipes and compact soil. Also, plant only grass above the drain field. Trees and shrubs can send roots into pipes and cause damage.
Keeping the area clear and protected ensures proper drainage. A little care goes a long way. Let’s also discuss warning signs you should never ignore.
Watch for Trouble Signs
Slow drains, foul smells, or soggy ground near the drain field may signal a problem. Gurgling sounds in plumbing can also be an early warning.
Catching issues early prevents major repairs. If you notice these signs, call a professional quickly. Acting fast can save thousands of dollars. Prevention is always easier than repair.
Budget and Cost Planning
Septic installation costs vary by location, soil type, and system design. On average, homeowners may spend between $5,000 and $15,000. Complex systems cost more.
While it may seem expensive, a well-installed septic system adds value to your home. Planning your budget early helps avoid surprises. Investing in quality work now reduces long-term expenses.
Environmental Benefits of Septic Systems
When installed properly, septic systems are eco-friendly. They treat wastewater naturally using soil filtration. This process reduces pollution and protects local water sources.
By maintaining your system, you also protect your community’s environment. Responsible homeowners play a big role in keeping groundwater clean. That’s something to feel proud of.
Final Thoughts
Septic installation is a step-by-step process that requires planning, testing, proper excavation, and ongoing care. From soil testing to final inspection, each stage matters. When done correctly, your septic system will serve your home safely for decades.
If you’re preparing for septic installation and want reliable guidance, professional support makes all the difference. For expert help and dependable solutions, visit nocoseptic.com to learn more about trusted septic services.
Questions
How long does septic installation take?
Most installations take 3 to 7 days. The timeline depends on soil conditions, weather, and inspection schedules.
How do I know what size septic tank I need?
Tank size depends on the number of bedrooms and household water use. A local health department or installer can guide you.
Can I install a septic system myself?
In most areas, professional installation is required by law. Proper permits, soil tests, and inspections must be completed.